- high precision
- fast response
- wide measurement range
- laboratory reference
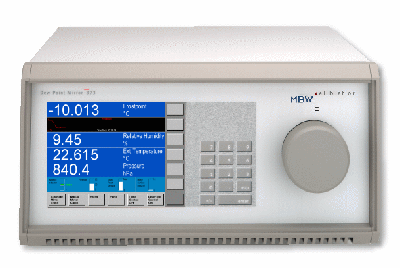
- full color high resolution LCD
|
 |
 Chilled mirror hygrometry, a process used to measure the dew or frost point of a gas, works in the following manner. Light shines onto a polished mirror surface, the temperature of which is controlled by a thermoelectric heat pump known as a Peltier element. A light-sensitive receiver measures the intensity of the direct reflection. When the mirror is clean and dry, the intensity of the reflected light is at its maximum. Conversely, a cold mirror with water vapor condensed on its surface scatters the light, resulting in less light directly reflected and in reduced signal intensity. Using this received light signal as feedback in a closed loop control system, the mirror may be cooled to the temperature at which the thickness of the condensed layer, detected through the intensity of the received light, remains constant. A condensate layer of constant thickness, with no further net increase or decrease in condensation, is in dynamic equilibrium with the gas surrounding the mirror. In this equilibrium condition, the dew or frost point temperature of the gas is determined by measuring the temperature of the mirror. If the condensate is known to be in liquid form, even for temperatures below freezing, then the measured mirror temperature is taken as the dew point. If the condensate is known to be in a solid form as ice or frost, then the measured mirror temperature is taken as the frost point.
 For mirror temperatures above 0°C, water vapor condenses on the mirror as liquid water (dew). A condensation layer resulting from a mirror temperature above 0°C is considered a dew point.
For mirror temperatures far below 0°C, water vapor condenses on the mirror as solid ice (frost). A condensation layer resulting from a mirror temperature far below 0°C is considered a frost point.
However, for mirror temperatures between 0 and approximately –20°C, the state of the condensed layer is indeterminate, and may be either water or ice, or some combination of the two. In this temperature range it is difficult to know, without visual observation, whether the system is controlling at the dew point, at the frost point, or somewhere in between. Since these states occur at different mirror temperatures for gas of the same water vapor content, it is important to determine which it is; errors resulting from this problem can be in excess of 2°C.
The 373 can automatically force all sub-zero condensation to a known state of frost, and thus eliminate the problem. Frost is ensured by rapidly cooling the mirror to below –40°C forcing the condensate to solidify, then quickly returning it to the previously predicted frost point temperature. It is then allowed to stabilize while ensuring the mirror temperature remains below 0°C. Once forced to freeze in this manner, the condensation will remain in frost for all subsequent mirror temperatures that continue to remain below 0°C.
Once the mirror temperature has risen above 0°C, subsequent attempts to stabilize in the indeterminate range between 0 and –20°C cause the system to cycle through forced frost formation once again. A forced frost cycle may also occur at the completion of any automatic or manual mirror check. By ensuring that sub-zero mirror temperatures are always forced to frost, the mirror temperature can be taken as the frost point temperature. Dew point temperature and other humidity parameters can be mathematically computed from the measured frost point temperature.
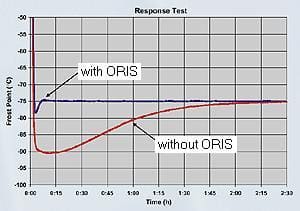 ORIS allows faster measurements at mirror temperatures below –60°C. At these low frost point conditions a chilled mirror hygrometer must cool the mirror to a value well below the actual frost point temperature in order to start the condensation process on the mirror. Due to the low water vapor content of the gas, building even a thin layer of frost on the mirror often requires several hours; the lower the frost point of the gas, the longer it takes.
ORIS reduces hours of delay into just minutes. When measuring low frost points, ORIS momentarily injects a small amount of water vapor into the gas stream. This water vapor expedites the initial formation of frost on the mirror, significantly reducing the amount of time required for a stable measurement. Measurements that once took several hours or more, are now performed in a matter of minutes.
The 373 is equipped with a dual mode (air, water) heat exchanger for bulk heat removal from the Peltier element. For dew point and frost point temperatures above approximately –40°C, air-cooling is generally sufficient. For lower values, externally supplied cooling water is often recommended. Cooling water connections are located on the instrument’s back panel. The temperature of the mirror, below which water cooling begins, can be selected from the touch screen. With the water valve on, the temperature of the recirculating water will control the temperature of the heat exchanger.
For measurement of very low frost point temperatures, a Dew Point Mirror 373L(X) must be used. Rather than using an air-water heat exchanger, the 373L(X) is equipped with an integral precooler using a closed-circuit direct refrigerant injection system for bulk heat removal of the Peltier element. The precooler allows the mirror to reach temperatures as low as –100°C without the need for any auxiliary equipment. The precooler may be operated in either a fixed temperature mode or at some delta above the currently measured frost point temperature. Both the mode and precooler temperature can be selected on the touch screen.
VCR couplings are used for the gas inlet and outlet connections on all low-range units. Electropolished tubing and orbitally welded connections minimize dead volume and water vapor entrapment in
the gas path.
In general, making measurements of high dew point temperatures, i.e. those above room temperature, can pose difficulties due to possible condensation within the sampling tubes. Preventing such condensation often requires the use of external heaters and controllers to maintain the temperature of all tubing above the dew point temperature of the gas. The 373 offers a simpler solution. In addition to automatic control of the internal tubing and measurement head temperatures, it controls an externally connected heated hose. Simply connect the hose and plug in the electrical connection. The hose may be controlled at either a fixed temperature, or at some delta
above the currently measured dew point temperature. The mode and temperature can be selected on the touch screen.
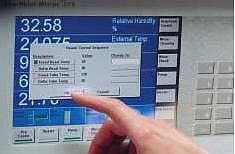
The automated Mirror Check procedure dries the mirror, compensates for the presence of contamination (residue) on the mirror, then returns the system to its previous operational status.
To dry the mirror, it is first heated to a pre-selected temperature, burning off any dew or frost. The reflected optical signal is then measured and evaluated for the presence of mirror surface contamination. The resulting contamination level is depicted on the Mirror Residue indicator. Based on the value entered for Heating Time, the system will be held at the selected temperature. Upon completion of the hold time, the optical signal is re-aligned to compensate for the effects of any remaining contamination. The system is then restored to its previous mode of operation. If it was in Dew/Frost Control prior to Mirror Check, then a new dew or frost layer will be established and measurement resumes.
Mirror Check may be triggered manually at any time by pressing the Mirror Check button. Alternatively, it may be placed in a timed automatic mode with an interval set by the Cycle Time. The cycle time for automatic mirror check can be set from as little as a few minutes to as long as 48 hours.
 - Full Color High Resolution LCD
- Touch Screen
- Selectable Display Parameters
- Selectable Units
- Numeric or Graph Format
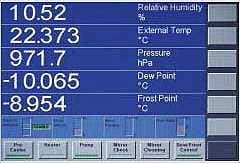
The system uses a full color active matrix liquid crystal display with an integral touch panel. It has a high contrast ratio and a wide viewing angle for easy readability. Data is displayed in large easy to read fonts. Using the on screen buttons and menus, you can easily configure each line of the display for a variety of humidity, temperature, and pressure parameters that may be viewed in either SI or non-SI units. A simple touch of a button toggles any parameter between numeric or graph format.
Set It and Forget It. Once the screen is set up the way you like it (parameters, units, numerics, graphics), the system remembers this configuration, powering up each time with your customized configuration.
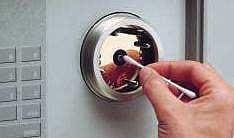 The mirror is mounted right on the front panel making it easily accessible for cleaning. Simply twist and remove the cover to gain complete access to the removable optical assembly and the flush mounted mirror surface.
| Model | 373LHX | 373LX | 373L | 373S3 | 373S | 373H | 373HX |
|---|---|---|---|---|---|---|---|
| Measuring range: | |||||||
| Dew/Frost point | -70 +95ºC |
-95 +20ºC |
-80 +20ºC |
-60 +20ºC |
-40 +20ºC |
-30 +70ºC |
-20 +95ºC |
| % RH @ 20C | 1–100% | 2–100% | 5–100% | ||||
| ppmv, minimum | 2.5 | 0.05 | 0.5 | 11 | 130 | 375 | 1000 |
| Thermoelectric mirror cooling: | 3-stage | 2-stage | |||||
| Cooling: | Refrigeration | Air/Water | |||||
| Measuring-head heating: | +100ºC | +40ºC | +40ºC | None | None | +60ºC | +100ºC |
| Accuracy: (Dew/Frost Point) |
± 0.1°C | ||||||
| Reproducibility: | ± 0.05°C Dew/Frost Point | ||||||
| Display: | Active Matrix Color Graphic LCD | ||||||
| Digital I/O: | RS-232 | ||||||
| Analog output: | 2 (optional 4) selectable ±10V 4...20mA | ||||||
| Gas couplings: | VCR Cajon 1/4" | Swagelok 1/4" | |||||
| Mirror temperature sensors: | PRT-100 | ||||||
| Sample gas pressure: | 35 psia (2.5 bar abs.) 150 psia (10 bar) optional |
||||||
| Sample gas flow rate: | 0.5... 1 l/min, internal pump and flowmeter | ||||||
| Sample gas circuit: | 316L stainless steel, electropolished | ||||||
| Operation temperature: | +15... +35°C | ||||||
| Storage temperature: | -10... +50°C | ||||||
| Ambient humidity: | 90% RH max., non condensing | ||||||
| Voltage: | 100... 120 VAC, 50/60 Hz or 200... 240 VAC, 50/60 Hz |
100... 240 VAC, 50/60 Hz | |||||
| Power consumption: | 500 W | 200 W | 300 W | ||||
| Width, mm (inch): |
440 (17.75) |
520 (20.50) |
440 (17.75) |
440 (17.75) |
440 (17.75) |
440 (17.75) |
440 (17.75) |
| Height, mm (inch): |
236 (9.25) |
236 (10.00) |
236 (9.25) |
236 (9.25) |
236 (9.25) |
236 (9.25) |
236 (9.25) |
| Depth, mm (inch): |
461 (18.25) |
461 (19.75) |
461 (20.25) |
461 (18.25) |
461 (18.25) |
461 (18.25) |
461 (18.25) |
| Weight, kg (lb): |
34 (75) |
34 (100) |
34 (100) |
20 (45) |
20 (45) |
20 (45) |
25 (55) |
MBW Callibration Ltd reserve the right to change design or technical data without notice.
Producer: